

A GENERAL DIRECTIVE TO HVAC/R TROUBLESHOOTING
This guide is meant to help with HVAC/R issues. We will not be discussing the specifics of local codes or OEM procedures. But, it is imperative as a technician that you understand basic refrigeration/heating and electrical fundamentals in order to safely carry out a proper diagnosis. If you are still struggling to grasp the fundamentals, I strongly recommend you talk with a senior technician while you are having your service. This article will highlight some of the obstacles you need to overcome before moving on to troubleshooting.
Technicians should consider their skills as trade detectives. This means they can collect information from a variety of sources. Depending on the nature of the problem, some service calls may take only a few minutes. Others can take hours or days.
Pro Tip: Be sure to have the correct PPE (personal safety equipment) in place before we begin troubleshooting.
This article has been enhanced with a podcast episode on HVAC/R Service. Listen to the HVAC Knowledge It All Podcast
DIAGNOSTIC & TECHNICAL TOOLS
A variety of tools are required to perform a system diagnosis. The tools listed below can be used to help you take a detailed picture of the problem.
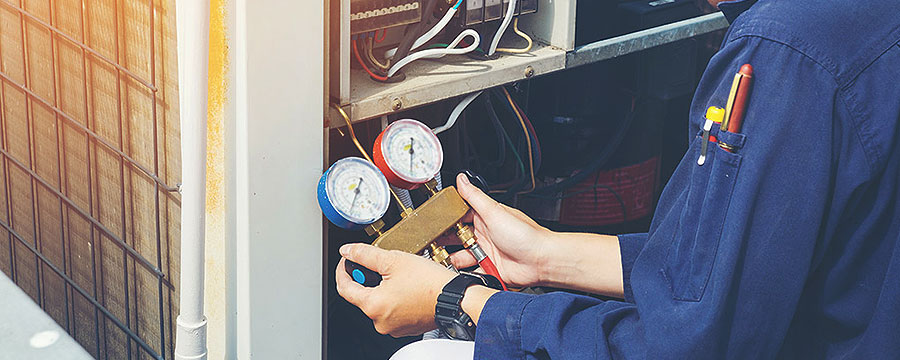
Manifold Gages
A compound set is made up of manifolds that are used for testing the system pressures in an air conditioning system or refrigeration system. You will also get an indication about the saturated temperature of each refrigerant. A digital apparatus, such as a manifold set of smart probes, is another option. Digital gauges provide temperature/pressure charts that can be viewed on the display screen. Or, they can be calculated by a mobile software.
This video explains how to check evaporator superheat using smart probes https://youtu.be/_fOKKGdYBZo
Thermometer or Clamp
You will need a temperature sensor device that can attach to the system’s refrigerant lines in order to test superheat/subcooling.
Multi Meter
The best multimeter will be used for all service calls as electrical problems are the most common. A multi meter (or combination of meters) should be able test AC/DC voltage, amp draws, resistance in Ohm settings, capacitor micro farads, and DC microamps of a flame sensor to help with basic troubleshooting.
Check out the video testing flame signal using DC micro amps https://youtu.be/gV7vjjtpJ5c. Also check out the video troubleshooting a walk in cooler condensing unit using different meter functions https://youtu.be/cfUUr0J8q3w.
Dual Port Manometer
The manometer has a few functions, such as checking the gas pressure inside a heating appliance, checking the differential pressure across filters and coils, and checking the static pressure within duct systems.
The modern manometers have many options. They can either be equipped with a display screen, or they can link to a smartphone via Bluetooth. Here are two videos displaying both types in action in the field https://youtu.be/tsLgkRaEyBY and https://youtu.be/a5SR4Ys6Fsk.
Electronic Refrigerant Leak Detector
A quality electronic leak detection can quickly and effectively detect leaks in a refrigeration system.
You should use a combination electronic leak detector and soap in order to check for a refrigerant leak. This article details the procedure. https://www.hvacknowitall.com/blogs/blog/164736-refrigerant-leak-checking-procedure#.X7bF_WlyaDY.
Hygrometer
A hygrometer measures temperature as well as humidity. The brand can also provide information such dew point and wet bulb temperature. This device is useful in checking the indoor and outdoor conditions of air, as well supply and return air.
You can check room conditions with a digital smart probe or mobile application.
There are other diagnostic tools you can use, such as:
* Combustion Analyzer
* Infrared temperature gun
* Thermal Imager
* Hot Wire Anemometer and Rotating Vane
SEQUENCE of OPERATION
Before we go into the details of how to approach a service visit, we need to first understand equipment sequence. What happens first then what happens second. As an example, we’ll use a residence furnace to illustrate the sequence of operation.
1. The thermostat can be used to call for heat.
2. The pressure switch must be used to prove the airflow within the combustion chamber. The induced fan operates a prepurge of the burner, and venting.
3. The ignition control is activated, provided all safety switches remain closed.
4. The ignition means (spark/hot surface ignitor) is enabled. The gas valve must be opened, and the burner lights as well as ignition must be proven.
5. After a time delay, the burner is lit and the blower fan kicks in to heat the exchanger.
6. After the gas valve is shut down, the thermostat sets and the burner turns off.
7. The induced motor fan operates after the burner has been purged and venting is completed.
8. The blower fan cools down the heat exchanger at a set time.
The information included in this article is extremely helpful for technicians looking to enhance their troubleshooting skills. The detailed explanations of diagnostic tools and the importance of safety measures make this a must-read for anyone in the field.
Definitely, Julia. The podcast episode mentioned in the article adds another layer of learning for those interested in HVAC/R service. A fantastic resource overall.
The inclusion of various video demonstrations and links to additional resources greatly enriches the article’s content. It’s a well-rounded guide for technicians seeking to improve their troubleshooting skills in HVAC/R systems.
Absolutely, Nharrison. The visual aids and supplemental resources make this article a valuable reference for any technician looking to enhance their expertise.
This article provides a comprehensive overview of the diagnostic and technical tools required for HVAC/R troubleshooting. The emphasis on fundamental understanding and safety measures is crucial for any technician. The detailed sequence of operation at the end is a great addition for beginners.
I completely agree with you, Scott. The importance of understanding the sequence of operation cannot be overstated. This article serves as a valuable resource for technicians at all levels of experience.
This article not only explains the importance of diagnostic tools, but also provides real-world examples and video demonstrations for better understanding. A commendable effort in educating technicians about troubleshooting HVAC/R systems.
The detailed explanation of the sequence of operation for a residence furnace is an excellent way to wrap up the article. The step-by-step breakdown enhances the reader’s understanding of how different components work together in a system.
I couldn’t agree more, Tina. The sequence of operation breakdown is a valuable component of this article, providing a comprehensive perspective on the entire process.